SRV_RADIUS
Co je to RADIUS server?
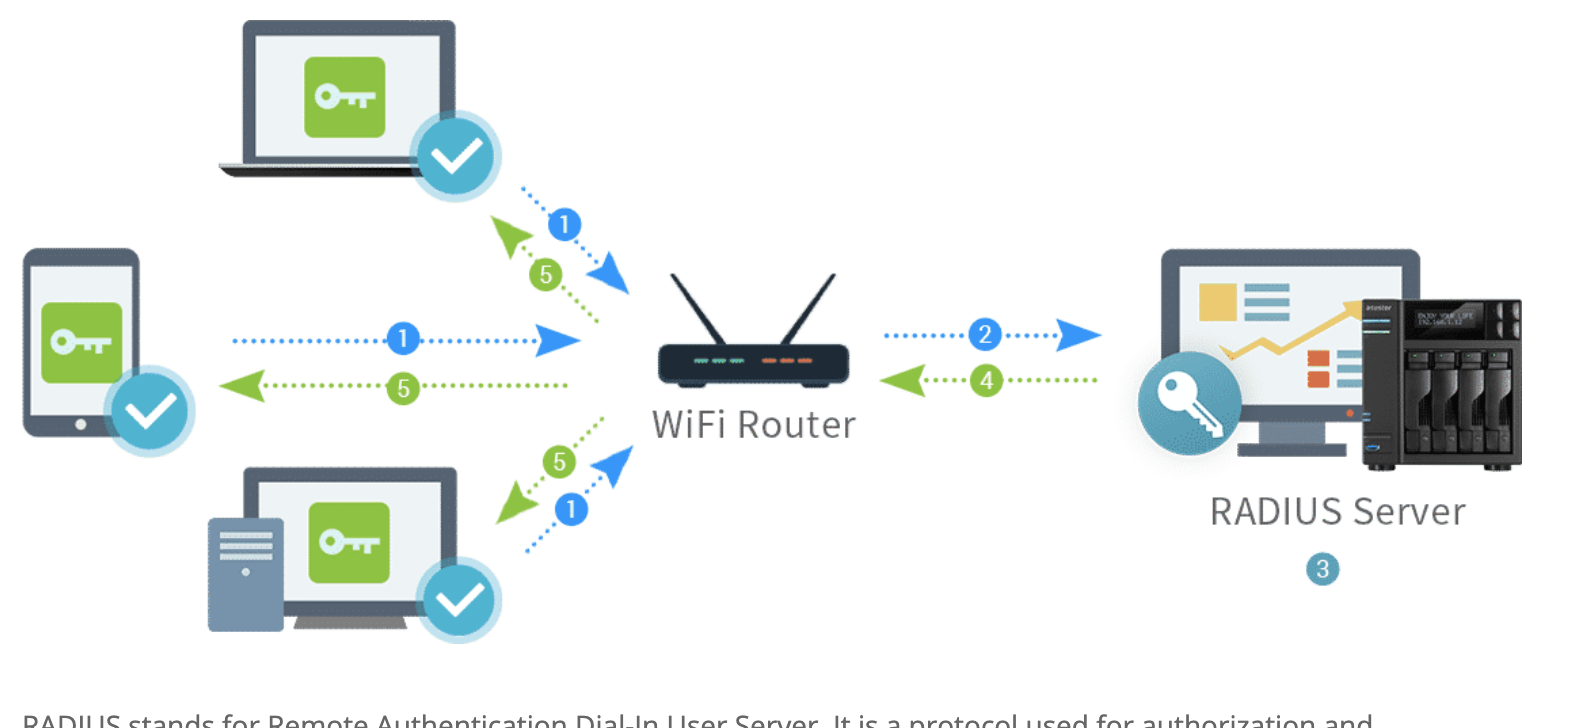
RADIUS stands for Remote Authentication Dial-In User Server. It is a protocol used for authorization and authentication. If you have a RADIUS server, you will have full control over who can connect your network and whom not to grant the access. This is applicable for all network types starting from wireless, VPN to direct and dial-up. Therefore, it is the middle layer in between the communication of the clients and servers.
Převzato z: https://www.freelancinggig.com/blog/2019/05/26/what-is-radius-server-and-how-it-works/
Odkazy ke studiu:
https://www.eduroam.cz/cs/spravce/pripojovani/radius/freeradius3
https://jumpcloud.com/blog/ldap-vs-radius/
https://www.freelancinggig.com/blog/2019/05/26/what-is-radius-server-and-how-it-works/
https://computingforgeeks.com/how-to-install-freeradius-and-daloradius-on-ubuntu/
https://computingforgeeks.com/install-mariadb-10-on-ubuntu-18-04-and-centos-7/
Návod na instalaci
1) Založíme nový LXC container
dle tohoto návodu: https://intranet.rs-kovarik.cz/srvtemplate Místo SRV_TEMPLATE zadat jméno SRV_RADIUS
2) Připojíme se k serveru přes terminál
ssh připojení k Turiisu a pak přes lxc-attach
Příkazy:
lxc-attach SRV_RADIUS
3) Instalace potřebných apache a PHP
Příkazy:
apt -y install apache2
apt -y install php libapache2-mod-php php-{gd,common,mail,mail-mime,mysql,pear,db,mbstring,xml,curl}
4) Instalace MariaDB a default konfigurace
Navod zde: https://computingforgeeks.com/install-mariadb-10-on-ubuntu-18-04-and-centos-7/
Příkazy:
apt install software-properties-common
apt-key adv --recv-keys --keyserver hkp://keyserver.ubuntu.com:80 0xF1656F24C74CD1D8
add-apt-repository "deb [arch=amd64,arm64,ppc64el] http://mariadb.mirror.liquidtelecom.com/repo/10.4/ubuntu $(lsb_release -cs) main"
apt update
apt -y install mariadb-server mariadb-client
Default konfigurace MYSQL - příkazy:
mysql_secure_installation
Projdeme kroky instalace dle guide:
$ sudo mysql_secure_installation

NOTE: RUNNING ALL PARTS OF THIS SCRIPT IS RECOMMENDED FOR ALL MariaDB
      SERVERS IN PRODUCTION USE!  PLEASE READ EACH STEP CAREFULLY!

In order to log into MariaDB to secure it, we'll need the current
password for the root user.  If you've just installed MariaDB, and
you haven't set the root password yet, the password will be blank,
so you should just press enter here.

Enter current password for root (enter for none):
OK, successfully used password, moving on...

Setting the root password ensures that nobody can log into the MariaDB
root user without the proper authorisation.

Set root password? [Y/n] y
New password:
Re-enter new password:
Password updated successfully!
Reloading privilege tables..
 ... Success!


By default, a MariaDB installation has an anonymous user, allowing anyone
to log into MariaDB without having to have a user account created for
them.  This is intended only for testing, and to make the installation
go a bit smoother.  You should remove them before moving into a
production environment.

Remove anonymous users? [Y/n] y
 ... Success!

Normally, root should only be allowed to connect from 'localhost'.  This
ensures that someone cannot guess at the root password from the network.

Disallow root login remotely? [Y/n] y
 ... Success!

By default, MariaDB comes with a database named 'test' that anyone can
access.  This is also intended only for testing, and should be removed
before moving into a production environment.

Remove test database and access to it? [Y/n] y
 - Dropping test database...
 ... Success!
 - Removing privileges on test database...
 ... Success!

Reloading the privilege tables will ensure that all changes made so far
will take effect immediately.

Reload privilege tables now? [Y/n] y
 ... Success!

Cleaning up...

All done!  If you've completed all of the above steps, your MariaDB
installation should now be secure.

Thanks for using MariaDB!
5) Vytvoření mysql databáze pro daloradius
Příkazy:
mysql -u root -p
Otevře se konzole mysql, vytvoříme DB (změníme heslo):
CREATE DATABASE radius;
GRANT ALL ON radius.* TO radius@localhost IDENTIFIED BY "radiuspassword";
FLUSH PRIVILEGES; quit
6) Instalace freeradius
Příkazy:
apt -y install freeradius freeradius-mysql freeradius-utils
7) Import the freeradius MySQL database scheme
Příkazy:
mysql -u root -p radius < /etc/freeradius/3.0/mods-config/sql/main/mysql/schema.sql
mysql -u root -p -e "use radius;show tables;"
Oprava tabulky aby fungobalo accounting:
mysql -u root
Otevře se konzole mysql
DROP TABLE radacct;
CREATE TABLE radacct (
radacctid bigint(21) NOT NULL auto_increment,
acctsessionid varchar(64) NOT NULL default '',
acctuniqueid varchar(32) NOT NULL default '',
username varchar(64) NOT NULL default '',
groupname varchar(64) NOT NULL default '',
realm varchar(64) default '',
nasipaddress varchar(15) NOT NULL default '',
nasportid varchar(15) default NULL,
nasporttype varchar(32) default NULL,
acctstarttime datetime NULL default NULL,
acctupdatetime datetime NULL default NULL,
acctstoptime datetime NULL default NULL,
acctinterval int(12) default NULL,
acctsessiontime int(12) unsigned default NULL,
acctauthentic varchar(32) default NULL,
connectinfo_start varchar(50) default NULL,
connectinfo_stop varchar(50) default NULL,
acctinputoctets bigint(20) default NULL,
acctoutputoctets bigint(20) default NULL,
calledstationid varchar(50) NOT NULL default '',
callingstationid varchar(50) NOT NULL default '',
acctterminatecause varchar(32) NOT NULL default '',
servicetype varchar(32) default NULL,
framedprotocol varchar(32) default NULL,
framedipaddress varchar(15) NOT NULL default '',
framedipv6address varchar(50) default NULL,
framedipv6prefix varchar(50) default NULL,
framedinterfaceid varchar(50) default NULL,
delegatedipv6prefix varchar(50) default NULL,
PRIMARY KEY (radacctid),
UNIQUE KEY acctuniqueid (acctuniqueid),
KEY username (username),
KEY framedipaddress (framedipaddress),
KEY acctsessionid (acctsessionid),
KEY acctsessiontime (acctsessiontime),
KEY acctstarttime (acctstarttime),
KEY acctinterval (acctinterval),
KEY acctstoptime (acctstoptime),
KEY nasipaddress (nasipaddress)
) ENGINE = INNODB;
exit;
8) Konfigurace freeradius aby využíval mysql
Příkazy:
ln -s /etc/freeradius/3.0/mods-available/sql /etc/freeradius/3.0/mods-enabled/
nano /etc/freeradius/3.0/mods-enabled/sql
Vložíme tam konfiguraci, vzorová bez komentáře je zde:
sql {
dialect = "mysql"
driver = "rlm_sql_mysql"
server = "127.0.0.1"
port = 3306
login = "radius"
password = "YOUR_PASSWD"
radius_db = "radius"
sslkey=/etc/ssl/client.key sslrootcert=/etc/ssl/ca.crt"
acct_table1 = "radacct"
acct_table2 = "radacct"
postauth_table = "radpostauth"
authcheck_table = "radcheck"
groupcheck_table = "radgroupcheck"
authreply_table = "radreply"
groupreply_table = "radgroupreply"
usergroup_table = "radusergroup"
delete_stale_sessions = yes
pool {
start = ${thread[pool].start_servers}
min = ${thread[pool].min_spare_servers}
max = ${thread[pool].max_servers}
spare = ${thread[pool].max_spare_servers}
uses = 0
retry_delay = 30
lifetime = 0
idle_timeout = 60
}
read_clients = yes
client_table = "nas"
group_attribute = "SQL-Group"
$INCLUDE ${modconfdir}/${.:name}/main/${dialect}/queries.conf
}
Nastavení práv:
sudo chgrp -h freerad /etc/freeradius/3.0/mods-available/sql
sudo chown -R freerad:freerad /etc/freeradius/3.0/mods-enabled/sql
Restart:
systemctl restart freeradius.service
systemctl status freeradius.service
Podíváme se do logu zda je to bez errorů:
cat /var/log/freeradius/radius.log
9) Instalace DALOradius
Příkazy:
wget https://github.com/lirantal/daloradius/archive/master.zip
unzip master.zip
mv daloradius-master daloradius
cd daloradius
Import Daloradius mysql tables:
mysql -u root -p radius < contrib/db/fr2-mysql-daloradius-and-freeradius.sql
mysql -u root -p radius < contrib/db/mysql-daloradius.sql
Zopakujeme část kroku 7) od tohoto "Oprava tabulky aby fungobalo accounting:"
10) Přesun daloradius + konfigurace
Příkazy:
cd
mv daloradius /var/www/html/
chown -R www-data:www-data /var/www/html/daloradius/
chmod 664 /var/www/html/daloradius/library/daloradius.conf.php
nano /var/www/html/daloradius/library/daloradius.conf.php
Pozměníme konfiguraci připojení k DB dle našich hodnot:
$configValues['CONFIG_DB_ENGINE'] = 'mysqli';
$configValues['CONFIG_DB_HOST'] = '127.0.0.1';
$configValues['CONFIG_DB_PORT'] = '3306';
$configValues['CONFIG_DB_USER'] = 'radius';
$configValues['CONFIG_DB_PASS'] = 'password';
$configValues['CONFIG_DB_NAME'] = 'radius';
11) Pár restartů a kontrol
Příkazy (berme s rezervou):
systemctl restart freeradius.service apache2
netstat -antup
service apache2 start
service apache2 status
netstat -antup
12) Konfigurace apache
Příkazy:
nano /etc/apache2/sites-enabled/000-default.conf
Změníme document root na:
DocumentRoot /var/www/html
service apache2 stop
service apache2 start
netstat -antup
13) Final reboot
Příkazy:
reboot
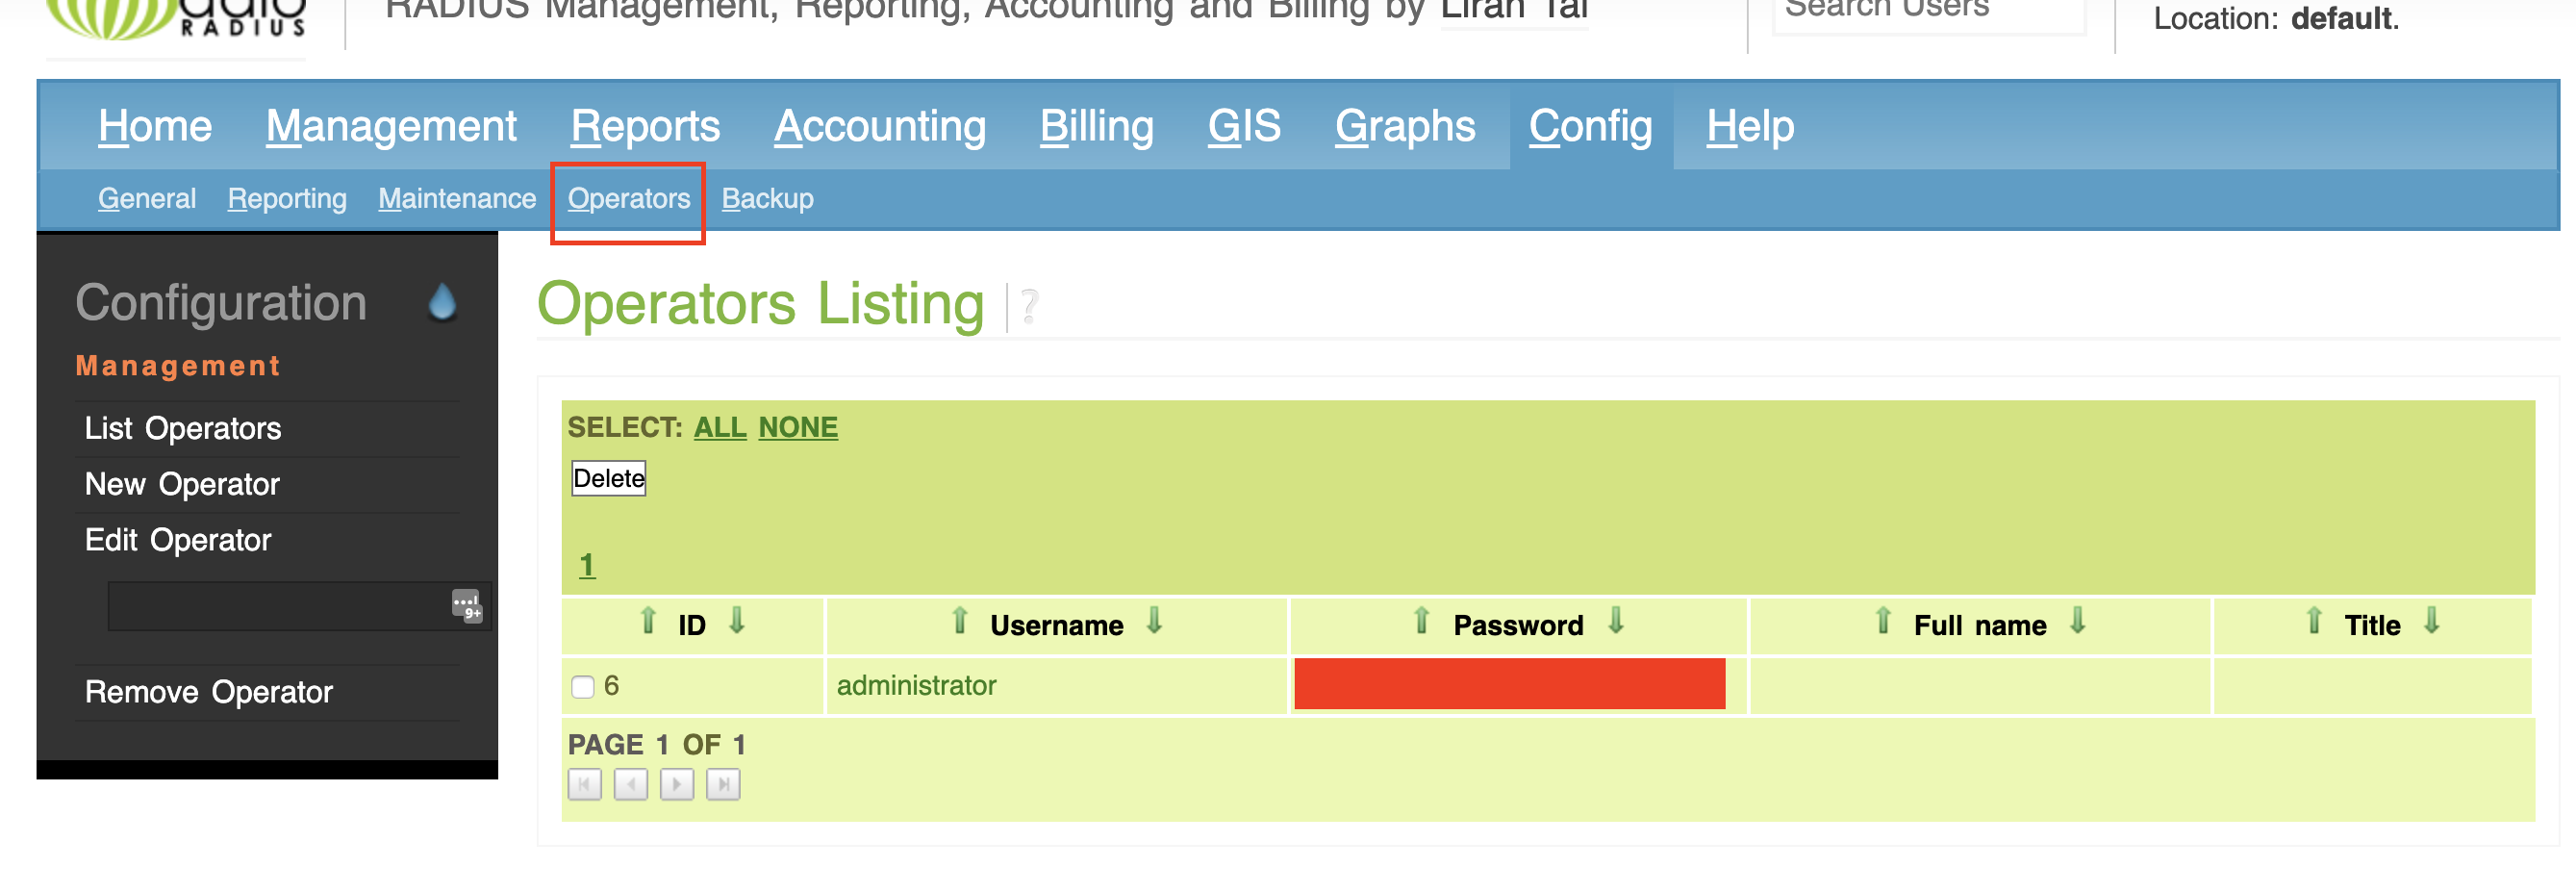
14) Konfigurace DALOradius z GUI
By default se zde pouzivaji cleartext password. Nezkousel jsem jine nastaveni...
Do web prohlížeče http://your_ip/daloradius
The default login credentials for daloRADIUS are, user:
administratorand password:radius.14.1) Změníme si default credentials
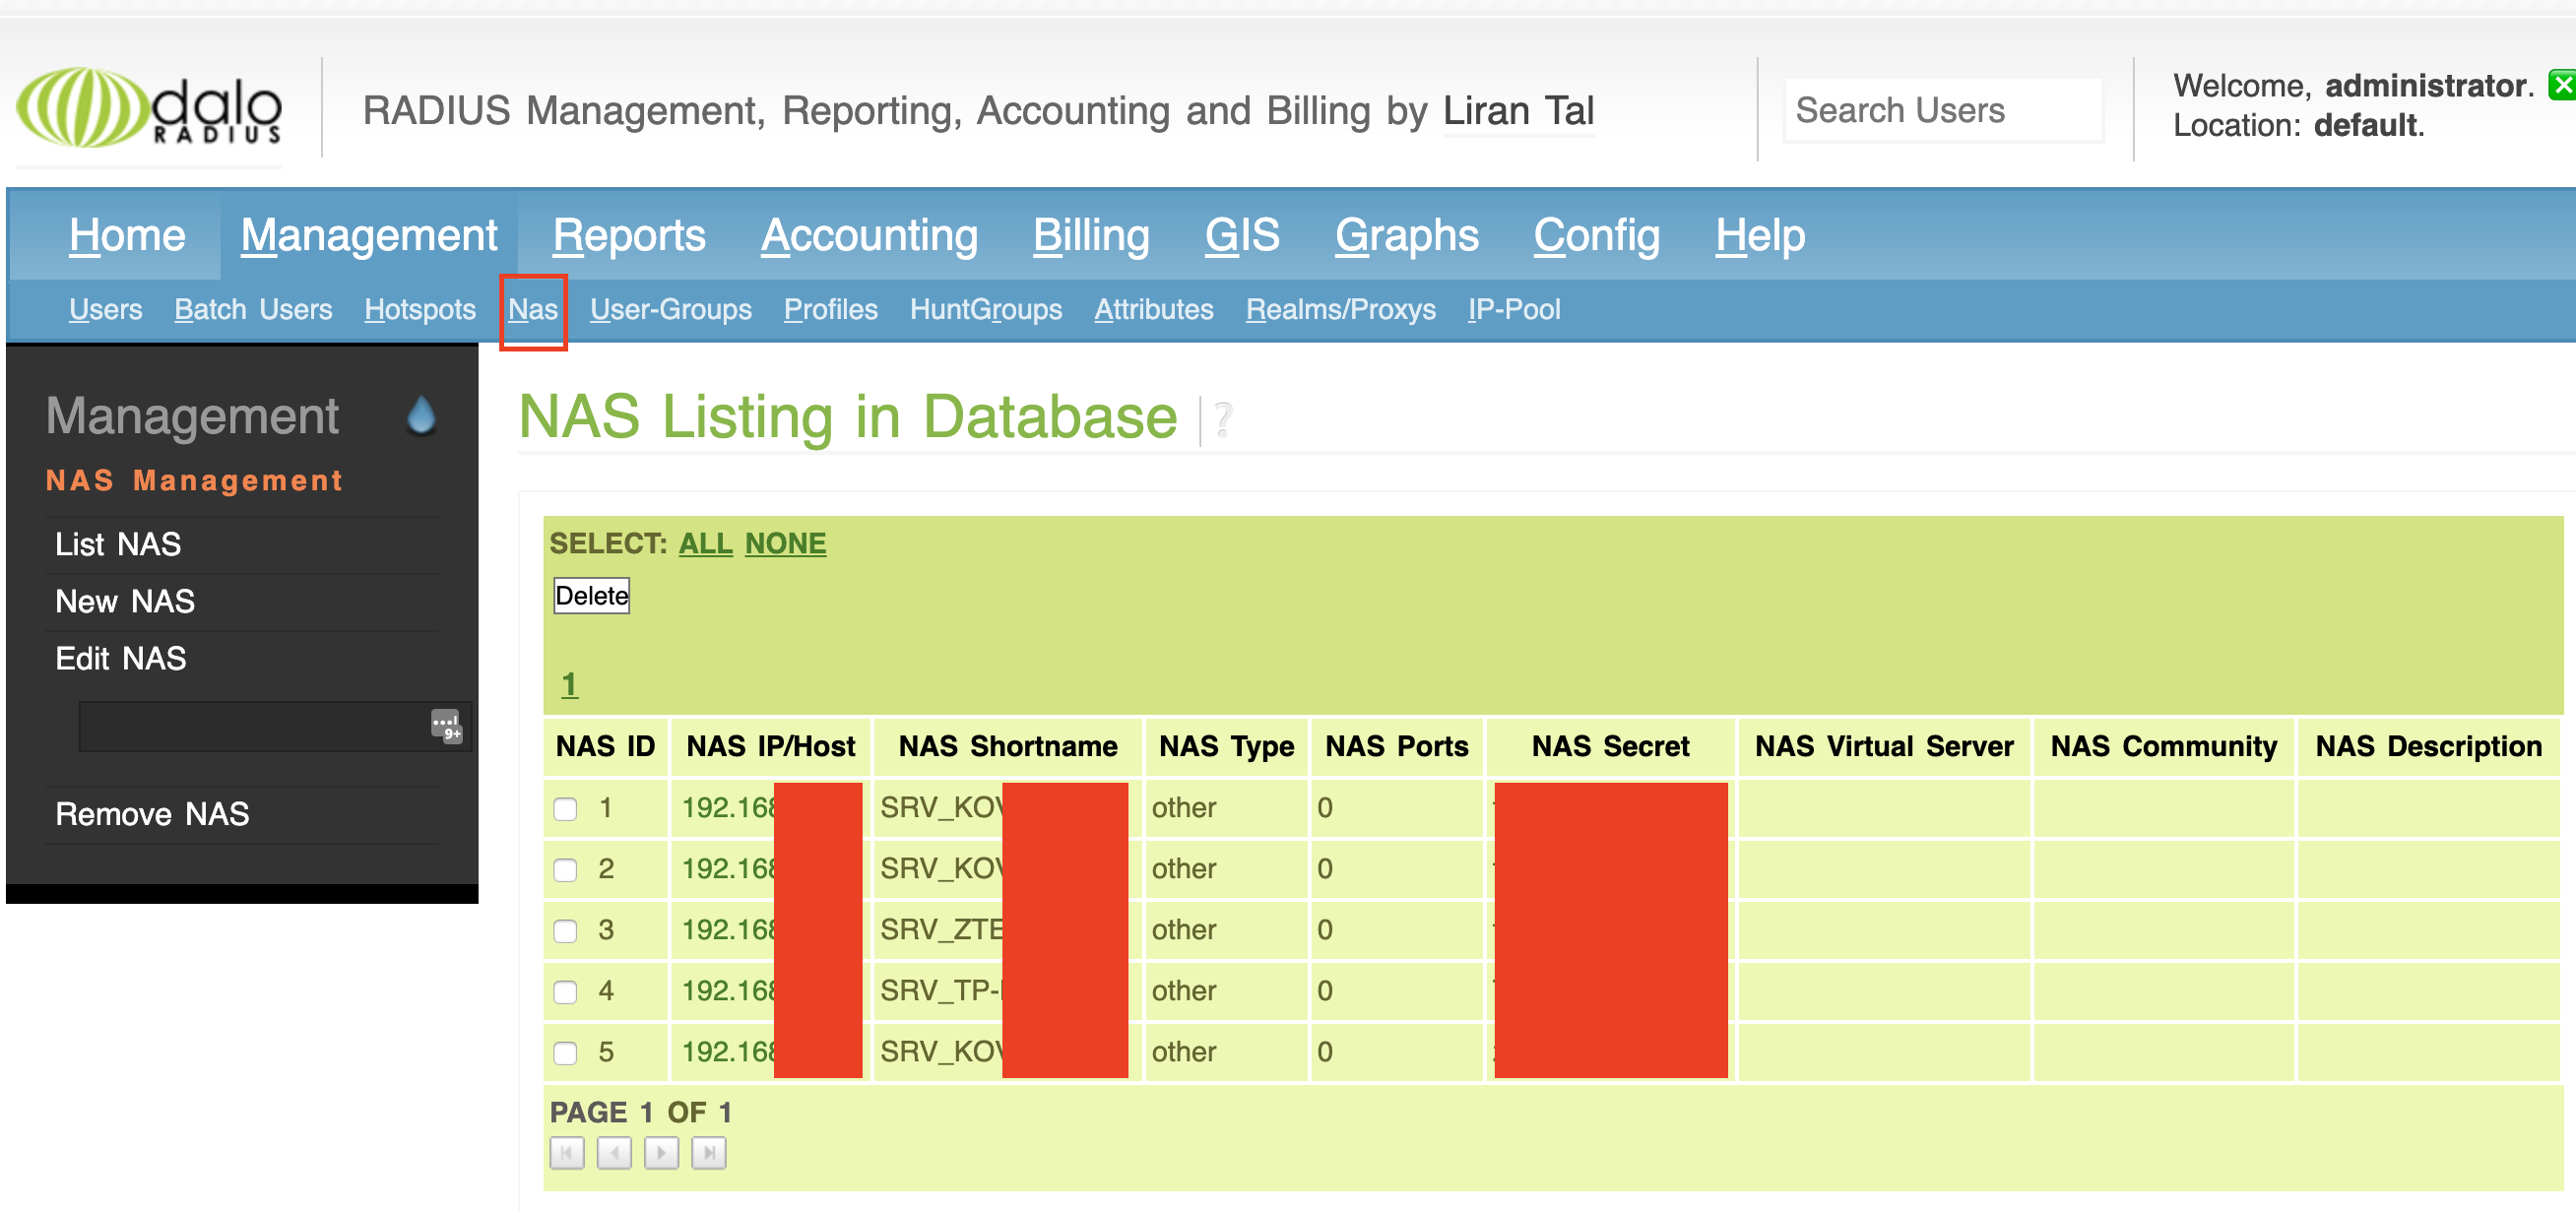
14.2) Pro každé AP vytvoříme jeden NAS
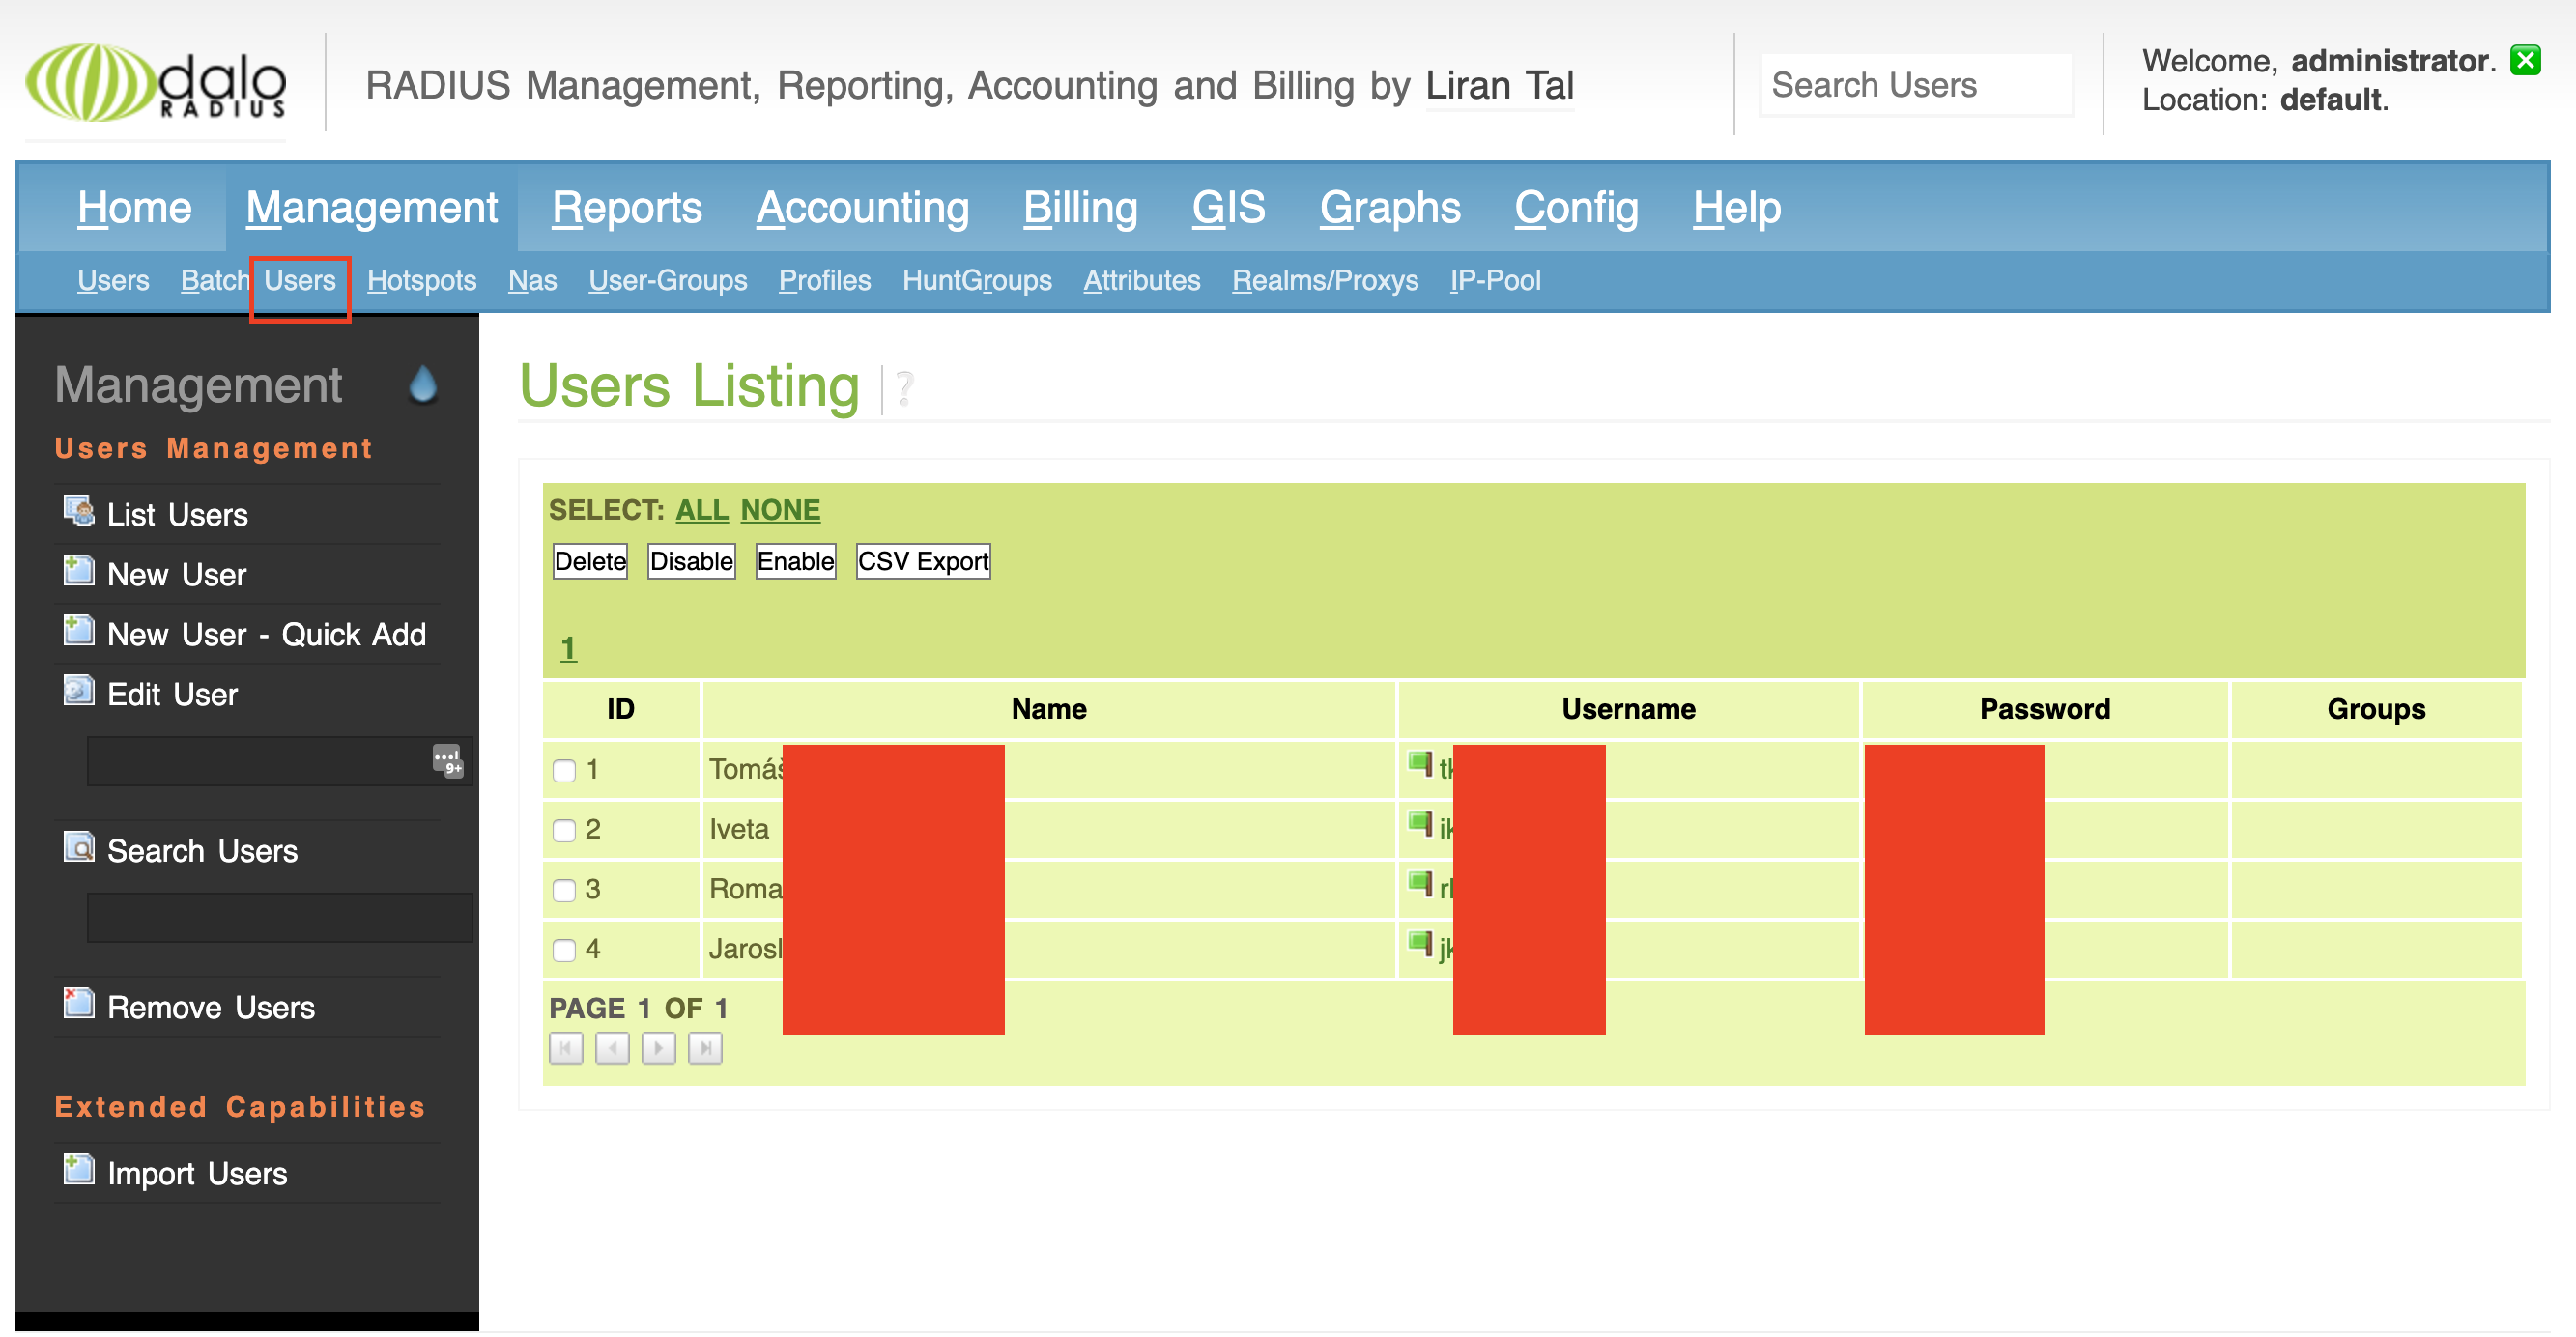
14.3) Pro každého uživatele vytvoříme jeden ucet
Pozor obdelnik na obrazku (users) ma byt vice vlevo.
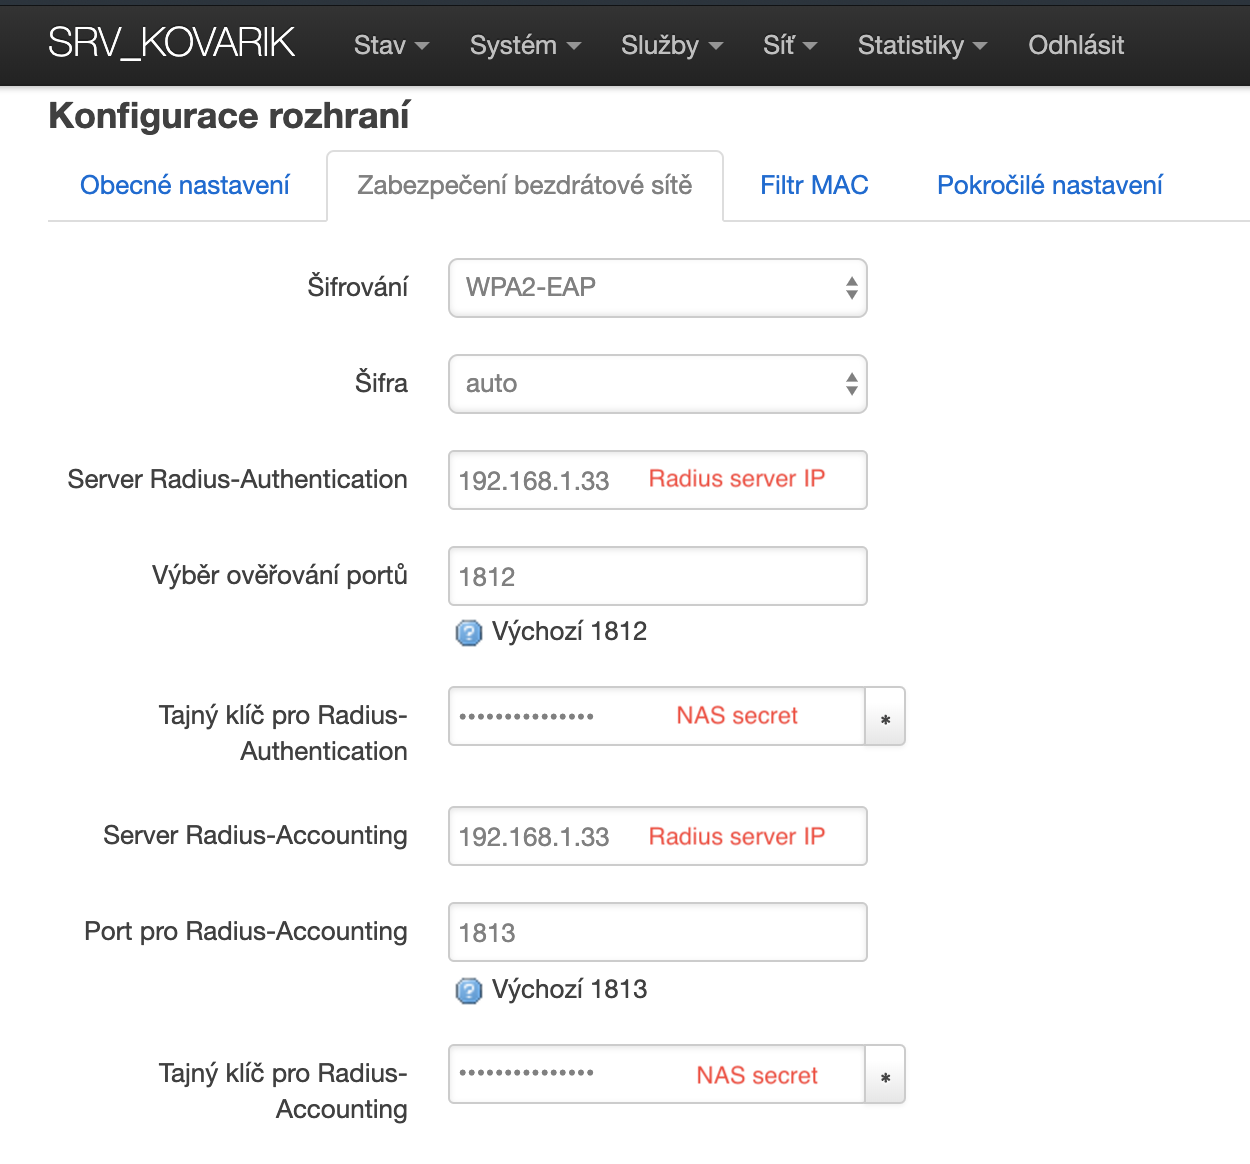
15) Konfigurace AP
(uvedu jeden priklad pro turris)
V LUcI přejdeme do nastavení bezdrátových sítí, do konfigurace dané wifi sítě, např: http://turrisIP/cgi-bin/luci/admin/network/wireless/radio0.network0
V kolonce Zabezpečení bezdrátové sítě nastavíme následující:
16) Final reboot all
restartujeme všechna AP a redius server.
Příkazy:
reboot
17) Use
následně se můžeme připojit k wifi dle našich credentials